T's Birthday Cake
One summer my friend was pregnant. She came and passed her due date too if I remember right. Well our birthday’s are 8 days apart so as she started approaching her birthday, I told her that she’d pass her birthday and have her son on my birthday. We went back and forth on that for a bit. When T finally came to be born, he was born on my birthday. I didn’t rub it in….. to much 🙂
So this year I decided I was going to make T a birthday cake. I’d been wanting to decorate a cake for a while… it’s been about 2 years since I last made one… So I was getting all excited! I know, silly but still 🙂 So I made it for our Sunday night dinner, which was the day after his/my birthday, but it still counts, right? Just ask Jill, she celebrates hers for a week 🙂
Now I did a cop out and just made a boxed cake mix. But the secret is in the pan. The pan I used is the large cupcake pan. But, nope, I didn’t make a large cupcake for him.


Once the cake has baked and is cooled, then you level it off with a long knife. Heck, the cut off tops are the best part to eat… LOL 🙂 I won’t tell if you eat them all…

So then gather the ingredients for your icing. Now Everyone has their own icing recipe that they like, but so far this has been my favorite.
Buttercream Icing (Stiff Consistency) Yield: 3 cups
1 cup solid white vegetable shortening (and if you live in humid climates, if you have the transfats included which isn’t Crisco, but is usually the off brand, it stands up better…)
1 tsp Flavoring (vanilla, almond, butter)
2 tbsp milk or water (I usually just use water)
1 lb (approx 4 cups) Confectioner’s sugar (you know, powdered sugar)
1 tbsp Meringue Powder
A pinch of salt (optional)
Cream shortening, flavorings and water. Add dry ingredients and mix on medium speed until all ingredients have been thoroughly mixed together. Blend an additional minute or so, until creamy.
To thin out to the different consistencies, just add 1 tbsp water at a time until you get medium or thin to your liking.
Now in our crazy Missouri weather, I usually have to go to about 3tbsp water in the original mix just so it isn’t STIFF!

Now to get the top of the “cupcake” to sit on the base, spread some icing on the base and then place the top in place.

Here’s normally where you’d put a small layer of icing all over the cupcake, however, since I chose to do a barn, I figured if a small amount of the cake were to show through, it’d be like an old barn… so I didn’t add my icing here. A lot of times you’d do that to a) cover the chocolate b) give the other icing a place to hang on to c) hide all the crumbs that might get into your icing.

I have the re-usable bags but chose to go easy here and went with the throw away kind. When you go to put your icing in the icing bag, the best trick is to pull it down over your hand like the picture below, then it’s easier to get your icing in and not get it all over the top part of the bag. Trust me, that’s a mess!

Then you shove your coupler down in the bag as far as it’ll go. It’ll make an ever so slight impression and then you cut at that small impression (that is closest to the tip)

Then push the coupler through.

Now you place the tip on and the coupler ring and you’re ready to rock ‘n roll 🙂

Fill your bag with the color icing you want and have at it. Since I’m making a bar I wanted my roof white and it to look shingled so I did short strokes with the icing.
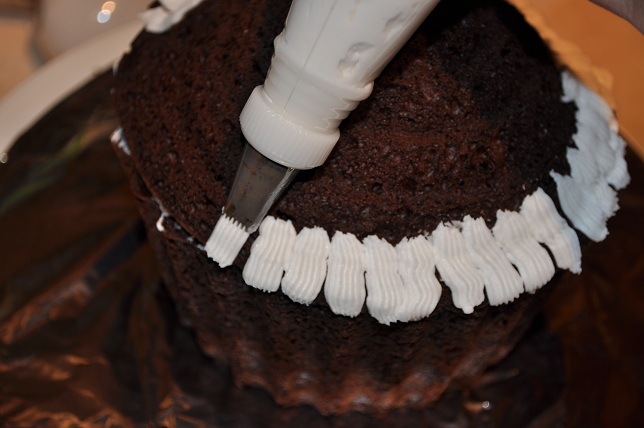
When I was finished it looked like this.

Next I like red barns so I mixed up some red icing and put a “pole” (or a big circle) looking tip on it and away I went again.

Here’s what we have so far.

Next I covered my board with green icing to look like grass.

Now this is my “secret” weapon. I always go and buy one of these little farm scenes to add to my cake. Then after the cake is eaten, you clean the icing off the decorations and the kids have a new toy 🙂

I used a small tip to draw on a door and a couple windows. Then colored some icing a yellow color to look like hay. I covered the hay wagon with yellow “hay” and had some hay coming out the barn windows.

And here was T’s final birthday cake.

I love making this cake. It turns out different every time because I get different farm scenes, but for $5 I couldn’t make cute farm scenes out of fondant for that. Plus that’d take way more time!
I think I spent about 2 hours decorating this so not bad at all. That also included going outside to watch the kids play in the pool (yes there were adults out there, just sayin) and helping M with her bee sting.

Man my baby makes beautiful cakes!!!!!!!!!!!!!!!!!!!!!!!!!!!!
WOW!!!!!!!!!!!! THAT TURNED OUT SOOO GOOD!!
I saw the top of the post and was anxious to see what you created this time. You are so great with cakes!
That is adorable!!!
That is an awesome cake!! Well done!!
PS – this year I think my birthday lasted 16 days…not bad, huh?? LOL
that is perfect, just so ya know , my birthday is in may , and I would loove a barn cake
First of all – how CUTE is PC commenting? AND he has a picture – I love it! LOL
That's adorable! We have the big cupcake pan too, I can't wait to use it – Love the barn idea. I saw a merry-go-round one too, Cool! It's a real pain to store though!
It looks AMAZING!!
Oh my gosh, are you serious?! You made that??? It's totally adorable!
That is sooo cute make me one!!! 🙂
Wow! That came out so cute!!
AWESOME idea!! I would never have thought about using a large cupcake pan for a barn! Super COOL!!!
Stef at TooMuchToDoSoLittleTime.com
Adorable!!
Great idea for the barn! We have made barn cakes before, but they are usually laying flat. I think I will be using this idea! 🙂